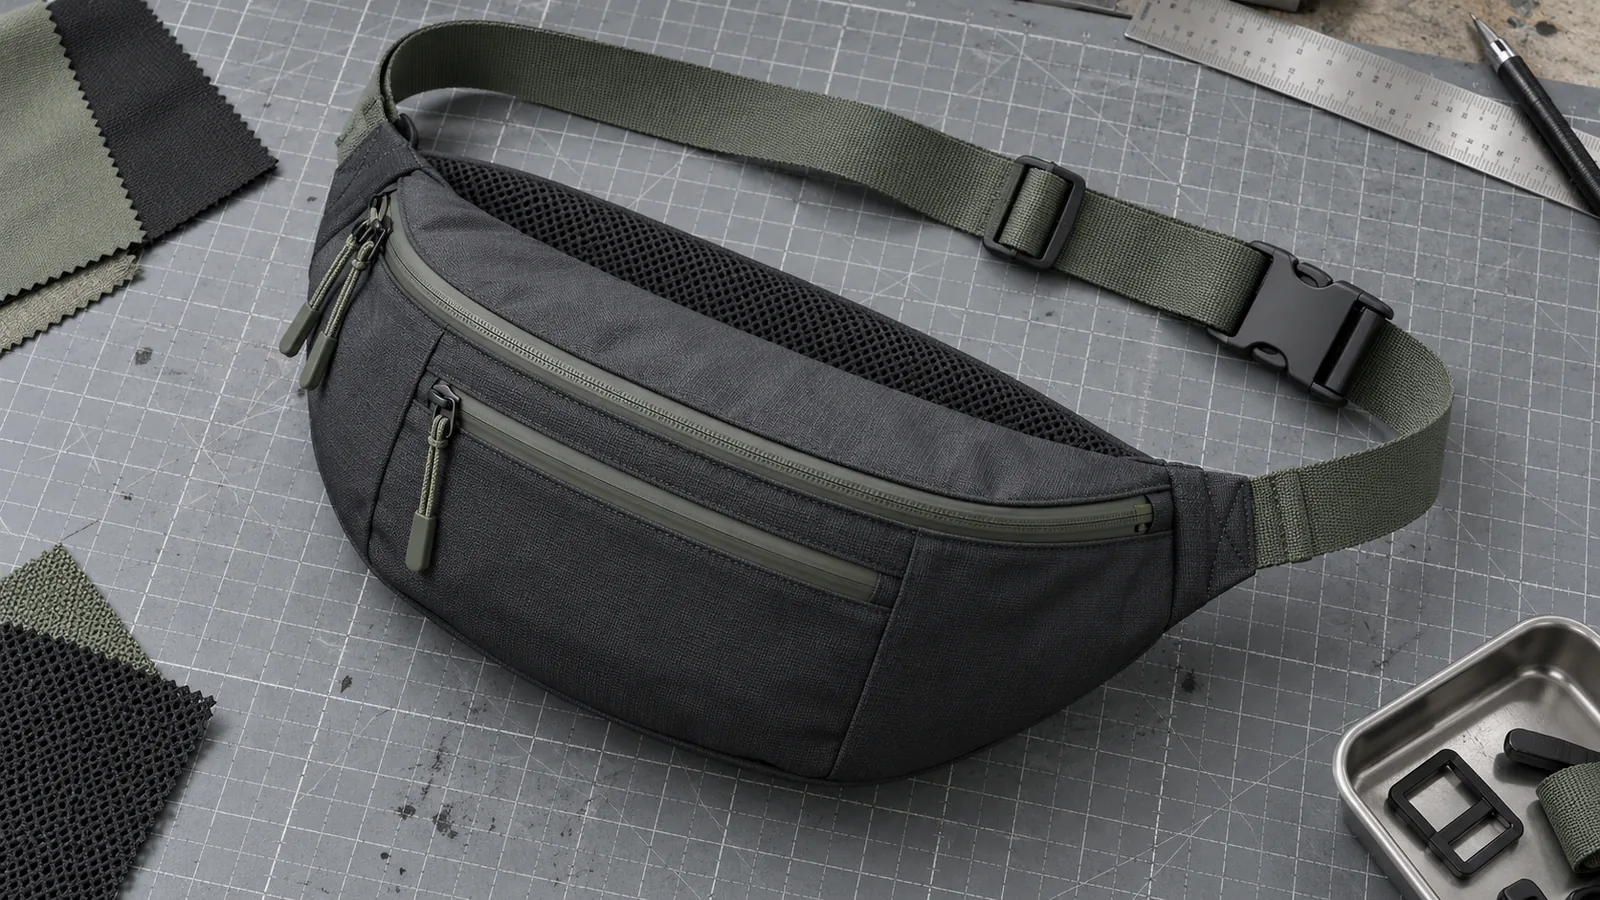
A belt or waist bag brief must describe a wearable system, not just a small zippered body with webbing attached. The body length, anchor positions, strap route, adjuster and buckle together determine the available circumference and how the bag sits. A supplier cannot derive those relationships from a front product image or a request for “one size.”
Good belt bags wholesale specifications state the intended wear positions, target adjustable range, measuring method, buckle direction, compartment access and body-facing construction. Good waist bags wholesale specifications do the same even when the market uses a different product name. The aim is not to promise universal fit or security. It is to give the factory an observable brief and give the buyer a repeatable sample-review method.
Start With Wear Positions and a Defined Measuring Method
Decide whether the product is intended primarily for the waist, high waist, hip, across the front torso, across the back or more than one orientation. Do not write “convertible” or “multi-wear” unless the strap and body have been reviewed in every claimed position. A bag that can physically be moved may still present poorly or restrict access in another orientation.
Define the fit range as a finished circumference measured through the body and strap system, not as webbing length alone. State whether buckle overlap, anchor tabs and the bag body are included. Draw the measurement path and show the adjuster at the shortest and longest intended settings. If the range is not final, provide a target range or mark it TBC for project review.
Avoid universal-fit claims. Buyers can define a commercial target based on their own market and fitting process, then approve a physical sample against that target. The supplier should not be asked to invent a body-size range or convert a generic “adult” label into a guaranteed fit statement.
This article differs from the Sling Bag versus Crossbody guide, which helps buyers choose between broader carry formats. It also differs from the crossbody strap specification checklist, which covers shoulder and crossbody strap BOMs. Here, the central issue is circumference, body-facing behavior, buckle routing and access when the bag is worn around or close to the body.
Map the Strap Route From Body to Buckle
Create one strap-path drawing that starts at the left body anchor, follows the webbing through the adjuster and buckle, and returns to the right anchor. Mark which component is fixed, which side adjusts and where any loose webbing end is controlled. Include front and body-facing views because the route may look correct from one side and twist from the other.
Specify webbing or strap width, surface and color direction; anchor-tab material and dimensions; stitch or reinforcement direction for review; adjuster type; buckle type; keeper or elastic loop; and finished tail treatment. These are component inputs, not performance claims. Use the handbag hardware guide to organize buckle, adjuster and finish decisions, then confirm the actual component proposal for the project.
Ask the sample reviewer to move the adjuster through the intended range and check whether the strap stays flat. Observe whether the loose end is controlled at both short and long settings, whether the buckle faces the intended direction and whether component edges contact the wearer-facing surface. Do not convert these observations into a load, security or long-term durability statement.
Place the Buckle and Adjuster for Each Intended Orientation
Buckle position affects reach, appearance and pressure against the body. State whether it should sit at the side, near the bag body, or elsewhere along the route in the primary wear position. If cross-torso wear is intended, review whether the buckle or adjuster sits under the arm, behind the shoulder or against the chest. A position that is convenient at the waist may be awkward across the torso.
The buyer should define buckle opening direction, male/female component orientation, face direction and finish or color. If a side-release buckle, metal clasp or another closure is proposed, approve the exact sample component rather than relying on a generic name.
Use a fitting sequence rather than one posed photograph:
- fit the sample at the shortest intended setting in the primary orientation;
- fit it at a midpoint and the longest intended setting;
- observe buckle and adjuster location at each point;
- confirm whether the strap twists between anchors and components;
- open each compartment in every intended wear orientation;
- record any setting where hardware presses against the body or access changes;
- photograph the strap path from the front, side and body-facing view.
This sequence checks the approved product brief. It does not establish universal fit, anti-theft performance or carrying capacity.
Shape the Body-Facing Panel and Anchor Transition
The rear panel determines how the bag contacts the body and how the strap force enters the bag. Specify the panel outline, finished body length, height, depth at the center and ends, and whether the back should be flat, curved or segmented. Mark any padding or material proposal as a construction input requiring sample approval, not as comfort or protection proof.
Show exactly where each strap anchor meets the body. An anchor can extend from the side seam, sit on the back panel, wrap around an end or connect through hardware. These choices affect the overall circumference and the way the body curves when worn. Photograph both transitions under normal sample fitting and inspect for twisting, uneven angles or obstruction of nearby zippers.
If the project uses soft fabric, leather or vegan leather, specify the actual material direction and review how it interacts with seams and anchors. The crossbody collection provides an adjacent assortment reference but does not establish a belt-bag material, fit, stock position or construction.
Balance Compartments With On-Body Access
Start with the primary compartment and opening path. Define zipper start and finish, single or double pullers, intended opening direction and whether the mouth should be operated with one or both hands during normal sample review. Then map any front, back or internal pocket.
A body-facing pocket may support a particular organization plan, but it should not be promoted as theft-proof or secure without evidence. Specify pocket dimensions, opening direction, closure, distance from panel edges and the items the buyer plans to check physically. If an item-fit claim is commercially important, provide the item's dimensions and document the result on the approved sample.
Keep the pocket plan proportionate to the body. A large rear zipper can compete with strap anchors; a deep front pocket can change the body profile; a divider can restrict the main opening. Review the open bag while it is worn in each intended orientation, not only while it lies flat on a table.
The wear-mode matrix below helps buyers expose conflicts before approving a specification:
| Review point | Waist or hip orientation | Cross-torso orientation | Approval evidence |
|---|---|---|---|
| Finished range | Measure through body, anchors, strap and closed buckle. | Check that the declared range is still suitable for the buyer's target. | Dated measurement photos at defined settings. |
| Buckle and adjuster | Confirm reach, face direction and loose-end control. | Check contact points and whether hardware moves under arm or shoulder. | Front, side and body-facing fitting views. |
| Strap route | Observe flatness from both anchors through components. | Check twisting as the route crosses the torso. | One marked route diagram plus physical sample views. |
| Main opening | Operate the zipper in the intended direction while worn. | Repeat without assuming access is equivalent. | Open/closed photos and recorded observations. |
| Secondary pockets | Confirm position relative to body and anchors. | Review reach and whether contents are being claimed to fit. | Pocket measurements and physical item check if required. |
| Body presentation | Observe end angles, back panel and body depth. | Observe whether the bag rotates or collapses differently. | Accepted view for every advertised orientation. |
Separate Ready Stock Selection From Custom Development
With Ready Stock handbags, select an exact item and ask for current colors, quantities, measurements, strap range, materials, branding options and packing. Fit and operate the actual item. A supplier category or old photograph does not prove current inventory or that the strap can be changed.
Existing-style customization may include feasible logo, color, material, lining, hardware or packaging changes. Ask whether a different strap length, buckle or pocket affects the existing construction. Even a seemingly simple component change can alter routing or the finished range, so it should appear on the sample or approval record as appropriate.
OEM development is appropriate when the body geometry, anchor system, strap route, buckle location or compartment plan must be created. The handbag product development service describes that route. Do not place an OEM request as “same shape, just make it fit everyone.” Give a measurable target, unresolved points and an expected sample-review sequence.
Quantity can be an estimate, range or TBC in the first inquiry. MOQ depends on the material, construction and customization scope. Price, sample fee, lead time, testing, packing and delivery basis require project-specific confirmation.
Conduct a Sample Fit and Access Review
Prepare a review sheet before the sample arrives. List the approved measurement method, shortest/longest target settings, intended orientations, body dimensions, pocket plan and component references. Use the same sheet for every revision so comments remain comparable.
Review in this order:
- Confirm body dimensions, panel shape and empty presentation.
- Trace the strap route and identify every component.
- Measure the finished range using the approved path.
- Fit each intended orientation at defined settings.
- Operate the buckle, adjuster and openings while worn.
- Inspect body-facing seams, anchors, pocket access and loose-end control.
- Confirm logo, lining, hardware appearance and packing.
- Issue one marked revision list and identify what needs another physical review.
If only one person is available for fitting, do not turn that result into a universal-fit conclusion. Record the observed setting and compare it with the buyer's target range. Broader fit claims require the buyer's own evidence plan.
Prepare an RFQ That a Factory Can Review
Send a compact package with:
- intended product name and primary/secondary wear positions;
- body dimensions and a defined finished-circumference measuring path;
- target adjustable range or estimate/range/TBC;
- strap width, route, anchors, buckle, adjuster and tail control;
- front and body-facing panel references;
- main opening and each compartment with dimensions;
- outer material, lining, hardware and logo direction;
- quantity by style/color, or current planning range;
- unit/retail packing needs and destination market;
- fit, access and appearance points that require sample approval.
Keep performance claims out of the RFQ unless you provide an applicable requirement and evidence process. A buckle type does not prove security, a padded back does not prove comfort, and a wide strap does not establish load capacity.
Frequently Asked Questions
What does “fit range” mean for a belt bag?
It should mean a defined finished circumference measured through the complete closed bag and strap system. State the measurement path and whether the body, anchors and buckle are included.
Can one strap specification cover waist and crossbody wear?
Possibly, but it must be reviewed in both orientations. Range, buckle position, adjuster location, strap twist, body presentation and compartment access may change.
Is a body-facing zipper pocket automatically more secure?
No. It describes location, not verified security performance. Specify the pocket and closure, then use evidence appropriate to any claim the buyer intends to make.
Do I need final quantities before requesting a feasibility review?
No. Provide an estimate, range or TBC by style and color. Final MOQ and commercial terms depend on the confirmed product and project scope.
Send the Wear System for Project Review
Share the intended wear positions, fit range, buckle direction, body and compartment brief, material choice and quantity context. Christori can review the sourcing route and missing specification inputs without treating a concept as confirmed stock, universal fit or a final commercial offer.